Automatic Image Captioning With PyTorch
This is my first open source project . I was selected as a Participant for Open Source Contributions at Student Code-in . Actually, It was a two months programme where I was selected for contributions to a Computer Vision Project : Image Captioning . In this project, I design and train a CNN-RNN (Convolutional Neural Network - Recurrent Neural Network) model for automatically generating image captions. In this case, LSTM (Long Short Term Memory), is used which is a special kind of RNN that includes a memory cell, in order to maintain the information for a longer period of time.
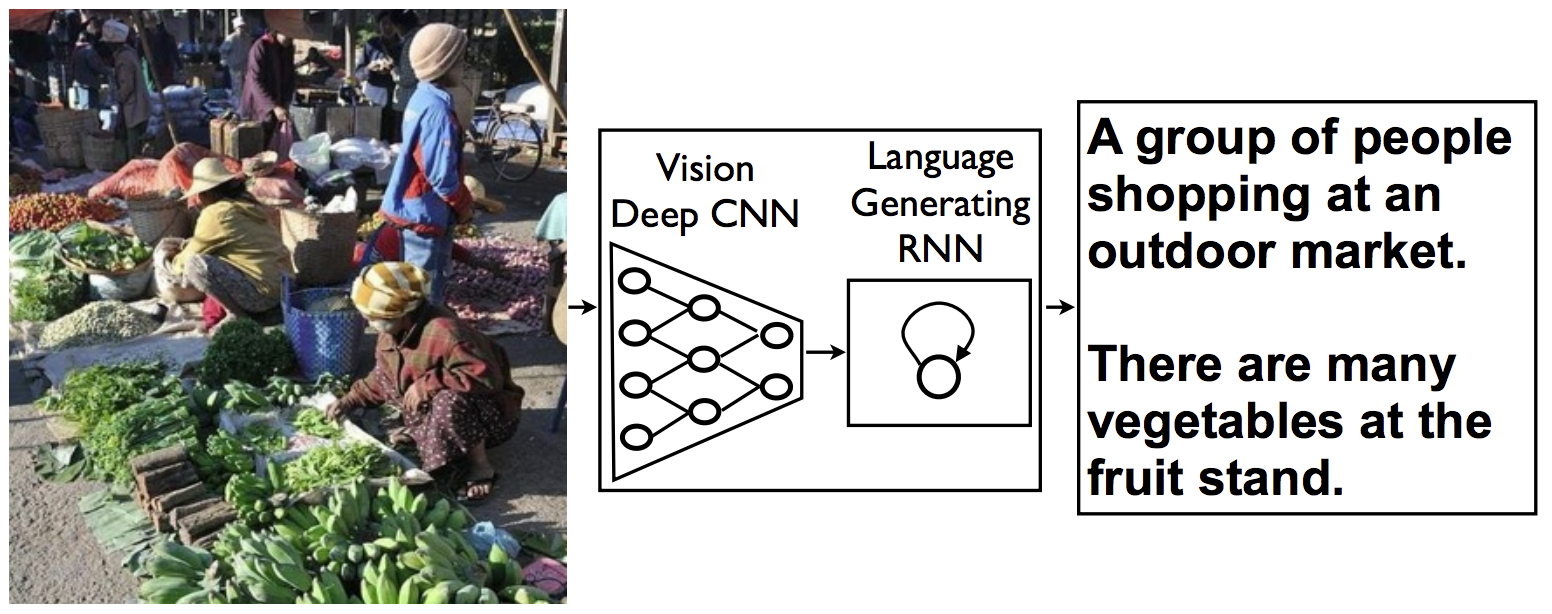
The network is trained on the Microsoft Common Objects in COntext (MS COCO) dataset. The image captioning model is displayed below.
Dataset Used - MS COCO Dataset
The COCO dataset is one of the largest, publicly available image datasets and it is meant to represent realistic scenes. What I mean by this is that COCO does not overly pre-process images, instead these images come in a variety of shapes with a variety of objects and environment/lighting conditions that closely represent what you might get if you compiled images from many different cameras around the world.
To explore the dataset, you can check out the dataset website
Captions
COCO is a richly labeled dataset; it comes with class labels, labels for segments of an image, and a set of captions for a given image . Here is an example :
 Image Source - Udacity
Visualize the Dataset
The Microsoft Common Objects in COntext (MS COCO) dataset is a large-scale dataset for scene understanding. The dataset is commonly used to train and benchmark object detection, segmentation, and captioning algorithms.

import os
import sys
sys.path.append('/opt/cocoapi/PythonAPI')
from pycocotools.coco import COCO

# initialize COCO API for instance annotations
dataDir = '/home/Project/Udacity-Computer-Vision-Nanodegree-Program/project_2_image_captioning_project/cocoapi'
dataType = 'val2014'
instances_annFile = os.path.join(dataDir, 'annotations/instances_{}.json'.format(dataType))
coco = COCO(instances_annFile)

# initialize COCO API for caption annotations
captions_annFile = os.path.join(dataDir, 'annotations/captions_{}.json'.format(dataType))
coco_caps = COCO(captions_annFile)

# get image ids
ids = list(coco.anns.keys())
import numpy as np
import skimage.io as io
import matplotlib.pyplot as plt
%matplotlib inline
# pick a random image and obtain the corresponding URL
ann_id = np.random.choice(ids)
img_id = coco.anns[ann_id]['image_id']
img = coco.loadImgs(img_id)[0]
url = img['coco_url']
# print URL and visualize corresponding image
print(url)
I = io.imread(url)
plt.axis('off')
plt.imshow(I)
plt.show()
# load and display captions
annIds = coco_caps.getAnnIds(imgIds=img['id']);
anns = coco_caps.loadAnns(annIds)
coco_caps.showAnns(anns)
A herd of animals grazing on a lush green field. A field with many cows and they're all laying down Cattle lying on the grass in a field while birds fly above them. A herd of cattle graze in a grassy field. Birds flying over cows in a green pasture.The CNN-RNN Architecture

Encoder CNN
Linear layer to transform the feature vector to have the same size as the word embedding.
class EncoderCNN(nn.Module):
    def __init__(self, embed_size):
        super(EncoderCNN, self).__init__()
        resnet = models.resnet50(pretrained=True)
        for param in resnet.parameters():
            param.requires_grad_(False)

        modules = list(resnet.children())[:-1]
        self.resnet = nn.Sequential(*modules)
        self.embed = nn.Linear(resnet.fc.in_features, embed_size)
        self.batch= nn.BatchNorm1d(embed_size,momentum = 0.01)
        self.embed.weight.data.normal_(0., 0.02)
        self.embed.bias.data.fill_(0)

    def forward(self, images):
        features = self.resnet(images)
        features = features.view(features.size(0), -1)
        features = self.batch(self.embed(features))
        return features
Decoder RNN

class DecoderRNN(nn.Module):
    def __init__(self, embed_size, hidden_size, vocab_size, num_layers=1):
        super(DecoderRNN, self).__init__()
        self.num_layers = num_layers
        self.hidden_size = hidden_size
        self.embed_size= embed_size
        self.drop_prob= 0.2
        self.vocabulary_size = vocab_size
        self.lstm = nn.LSTM(self.embed_size, self.hidden_size , self.num_layers,batch_first=True)
        self.dropout = nn.Dropout(self.drop_prob)
        self.embed = nn.Embedding(self.vocabulary_size, self.embed_size)
        self.linear = nn.Linear(hidden_size, self.vocabulary_size)
        self.embed.weight.data.uniform_(-0.1, 0.1)
        self.linear.weight.data.uniform_(-0.1, 0.1)
        self.linear.bias.data.fill_(0)

    def forward(self, features, captions):
        embeddings = self.embed(captions)
        features = features.unsqueeze(1)
        embeddings = torch.cat((features, embeddings[:, :-1,:]), dim=1)
        hiddens, c = self.lstm(embeddings)
        outputs = self.linear(hiddens)
        return outputs
Caption Pre-Processing
Tokenizing Captions
sample_caption = 'A person doing a trick on a rail while riding a skateboard.'
import nltk

sample_tokens = nltk.tokenize.word_tokenize(str(sample_caption).lower())
print(sample_tokens)
sample_caption = []

start_word = data_loader.dataset.vocab.start_word
print('Special start word:', start_word)
sample_caption.append(data_loader.dataset.vocab(start_word))
print(sample_caption)
# Preview the word2idx dictionary.
dict(list(data_loader.dataset.vocab.word2idx.items())[:10])Output {'<start>': 1,
'<end>': 0,
'<unk>': 2,
'a': 3,
'and': 6,
'clean': 5,
'decorated': 8,
'empty': 9,
'very': 4,
'well': 7} # Modify the minimum word count threshold.
vocab_threshold = 6
# Obtain the data loader.
data_loader = get_loader(transform=transform_train,
mode='train',
batch_size=batch_size,
vocab_threshold=vocab_threshold,
vocab_from_file=False)# Print the total number of keys in the word2idx dictionary.
print('Total number of tokens in vocabulary:', len(data_loader.dataset.vocab))Output
Total number of tokens in vocabulary: 8099Conversion Of Word To Vectors

Training The Model
import torch
import torch.nn as nn
from torchvision import transforms
import sys
sys.path.append('/opt/cocoapi/PythonAPI')
from pycocotools.coco import COCO
from data_loader import get_loader
from model import EncoderCNN, DecoderRNN
import math


## TODO #1: Select appropriate values for the Python variables below.
batch_size = 32          # batch size
vocab_threshold = 6        # minimum word count threshold
vocab_from_file = True    # if True, load existing vocab file
embed_size = 512           # dimensionality of image and word embeddings
hidden_size = 512          # number of features in hidden state of the RNN decoder
num_epochs = 1             # number of training epochs (1 for testing)
save_every = 1             # determines frequency of saving model weights
print_every = 200          # determines window for printing average loss
log_file = 'training_log.txt'       # name of file with saved training loss and perplexity

# (Optional) TODO #2: Amend the image transform below.
transform_train = transforms.Compose([
    transforms.Resize(256),                          # smaller edge of image resized to 256
    transforms.RandomCrop(224),                      # get 224x224 crop from random location
    transforms.RandomHorizontalFlip(),               # horizontally flip image with probability=0.5
    transforms.ToTensor(),                           # convert the PIL Image to a tensor
    transforms.Normalize((0.485, 0.456, 0.406),      # normalize image for pre-trained model
                         (0.229, 0.224, 0.225))])

# Build data loader.
data_loader = get_loader(transform=transform_train,
                         mode='train',
                         batch_size=batch_size,
                         vocab_threshold=vocab_threshold,
                         vocab_from_file=vocab_from_file)

# The size of the vocabulary.
vocab_size = len(data_loader.dataset.vocab)

# Initialize the encoder and decoder.
encoder = EncoderCNN(embed_size)
decoder = DecoderRNN(embed_size, hidden_size, vocab_size)

# Move models to GPU if CUDA is available.
device = torch.device("cuda" if torch.cuda.is_available() else "cpu")
encoder.to(device)
decoder.to(device)

# Define the loss function.
criterion = nn.CrossEntropyLoss().cuda() if torch.cuda.is_available() else nn.CrossEntropyLoss()

# TODO #3: Specify the learnable parameters of the model.
params = list(decoder.parameters()) + list(encoder.embed.parameters()) + list(encoder.bn.parameters())

# TODO #4: Define the optimizer.
optimizer = torch.optim.Adam(params, lr=0.001, betas=(0.9, 0.999), eps=1e-08)
# optimizer = torch.optim.Adam(params, lr=0.01, betas=(0.9, 0.999), eps=1e-08)
# optimizer = torch.optim.RMSprop(params, lr=0.01, alpha=0.99, eps=1e-08)

# Set the total number of training steps per epoch.
total_step = math.ceil(len(data_loader.dataset.caption_lengths) / data_loader.batch_sampler.batch_size)Prediction Function
The get_prediction function was used to loop over images in the test dataset and print model's predicted caption.def get_prediction():
orig_image, image = next(iter(data_loader))
plt.imshow(np.squeeze(orig_image))
plt.title('Sample Image')
plt.show()
image = image.to(device)
features = encoder(image).unsqueeze(1)
output = decoder.sample(features)
sentence = clean_sentence(output)
print(sentence)
A large elephant standing next to a tree .

A person holding a cell phone in their hands .More Predictions
This is my complete open source project on GitHub .References
1. Show, Attend and Tell: Neural Image Caption Generation with Visual Attention( https://arxiv.org/pdf/1502.03044.pdf)Happy Learning !

Great one, nicely explained 💯💯🤩
ReplyDeleteIntresting stuff to read. Great job and thanks for sharing such a blog !!🤩
ReplyDeleteNice one keep learning buddy👍🎉
ReplyDelete